The dm Verity is a Linux kernel driver for verifying the integrity of a partition at runtime using a hash tree and signed metadata. It is used for verified booting of Android Phones. dm verity feature supports the phones with Android 4.4 or Later. Basically dm-verity can protect you against malware modifying the system however it can also protect you from accidental corruption with its forward-error-correction feature.

The dm verity feature is very good for the security of Android phone. But, When you flash an unauthorized custom rom or TWRP recovery, device shows dm verity error. Although, it can be easily fixed and encryption can also be disabled. Here we comes with a guide How to Disable dm verity on Samsung Galaxy S7 and S7 Edge.
Samsung Galaxy S7 and S7 Edge are packed with more improved camera with a 12 Megapixel sensor having LED flash and IR sensor on the back. And 5MP on the front side for selfies, a 5.1-inch Super AMOLED Quad HD screen, 3,000mAh battery. Galaxy S7 is powered with Snapdragon 820 processor with 4GB RAM, 32GB built-in storage with microSD support up to 200GB. The only difference between both Galaxy S7 and S7 Edge is its display. The Galaxy S7 Edge comes with curved display whereas Galaxy S7 comes with normal one.
Pre requisites
- Download dm-verity and forced encryption disabler.
- The latest TWRP Recovery for Samsung Galaxy S7/S7 Edge.
- Download and install Samsung USB drivers.
- Download latest Odin Flasher and install it.
- Download the Official ROM and recovery for your Phone.
- Download latest supersu version
- Charge your phone at least up to 60%.
How to Disable Forced Encryption(dm verity), and Root Samsung Galaxy S7

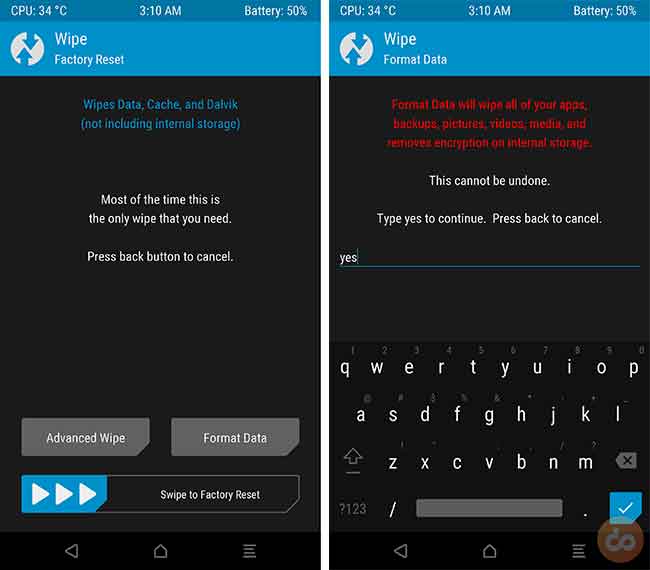
- After installing TWRP, go to Wipe > Format Data. Enter the keyword ‘yes‘, in the provided space and enter. This will wipe the automatically encrypted filesystem, and decrypt it.
- Once the wiping is done, reboot back into recovery. Go to Reboot > Recovery.
- When the recovery boots again, connect your S7 to the PC and Enable MTP under the Mount section.
- Copy the downloaded latest version of dm verity disabler and latest version of SuperSU to your Galaxy S7’s internal storage.
- Disconnect the device now.
- Now, if you’re only looking for decryption and booting your device without root, follow the step.
- Tap on Install. Now, navigate your phone’s storage and select “no-verity-opt-encrypt-5.1.zip”. Finally, swipe the button on the bottom of the screen. The flashing process will merely take a few seconds.
- If you’re looking for a complete root, along with decryption, then follow the stated.
- Tap on Install button. Browse the storage, select and flash the “SuperSU-v2.82-201705271822.zip” file.
- Okay, it’s done. Go to Reboot and tap on System to finally reboot your S7.
The first boot might take a few minutes, so don’t worry, have patience and let it do its job. Now that you have installed TWRP and rooted the Galaxy S7, you can choose to install custom ROMs, kernels, or mods.
You might also like
- Latest TWRP 3.2.3 now out for most of the supported devices
- How to Install OnePlus 6 TWRP Recovery
- How to Flash TWRP Recovery on Galaxy S9/S9+ (Snapdragon)
If you’re facing any issues during the process? Let us know through comments. Don’t forget to share this article with your friends who own the S7.
